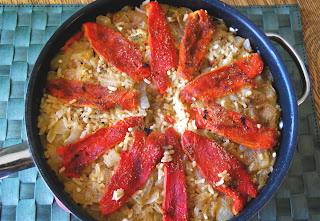
 This dish, rather this method for making rice, is based on Mark Bittman's Tomato Paella. I have made the original recipe with the tomato wedges and it's great. But now I just use this method whenever I want a one pan rice dish, especially when I want to incorporate other cooked ingredients rather than having just plain rice on the side. It's just a great method that lends itself to whatever ingredients you have on hand. And the next day the flavors are even deeper.
For this version I used red peppers that I had roasted on the grill earlier in the week and homemade chicken stock. In the past I've used vegetable stock, homemade chicken stock, homemade shrimp stock (the shrimp went into the dish), and plain water. I've added a splash of white wine. And I've added so many different seasonings and vegetable combinations I can't recall them all.
Here is what you need:
2 tbsp extra virgin olive oil
1 large onion, diced
3-5 cloves garlic, chopped (hey, we love garlic)
1 heavy tbsp tomato paste
2 heavy tbsp canned, diced, green chili
1 heavy tsp freshly ground cumin
1/2 tsp freshly ground allspice
salt & pepper to taste
2 cups short grain rice, like Spanish bomba or Italian arborio
3 1/2 -4 cups broth/stock/water, heated to almost simmering
Make sure you have an oven-proof pan with straight sides large enough to hold all of these ingredients. Begin by preheating your oven to 450 degrees. Heat the oil on medium-high. Have your hot stock close at hand. Once the oil is hot, add the onion and cook about 5 minutes. Add garlic and cook another minute. Stir in tomato paste, green chili, salt, pepper, cumin, and allspice and combine.
Add rice and stir to coat all the grains. Cook for just another minute or so. Next add the hot stock and stir to combine. At this point you can taste for seasoning and adjust if necessary. This is when you add your starring veggies or shrimp or chicken or anything else.* Bring it all back up to a boil.
Once the liquid is boiling, put the pan in the oven and cook for a total of 15 minutes. At 15 minutes I check for doneness by tasting a couple grains. If more time or liquid is needed, I make the adjustments and continue cooking a few minutes at a time until the rice is tender. Take the pan out of the oven and let it sit for a few minutes. Do not, I repeat, do not grab that pan handle without an oven mit. I did it once. Once. That was a long night and the blisters lasted a few weeks.
A nice suggestion in Bittman's original recipe is to "put the pan over high heat for a few minutes to develop a bit of a bottom crust before serving." I've not tried this yet because we always eat before I can think to do it. But it sounds good.Once you dig in the design is ruined so I photographed the dish in its pre-chow form, still in the pan.
*I have found that arranging veggies and things in decorative patterns is for naught if you do it right after you've added the liquid. Everything ends up floating all over the place and whatever design you've created is lost. If presentation is important, I cook the dish for at least five minutes and then add my decorative ingredients. That's what I did with the peppers in the photo. I rarely do this but I wanted you to see that it's a nice touch.

4 comments:
Nice idea...it's red pepper season!
Peter, exactly!
It's always exciting finding new, fun rice recipes. Sometimes I just run out of ideas! :D
Sophie, that's why we read food blogs, huh?
Post a Comment