Adventures

Showing posts with label potential vegan. Show all posts

Jan 25, 2011

Slaw

Now this is some good coleslaw. Why don't I make this more often? Recently, I was in California visiting my sister and my mom. My mom had just had knee replacement surgery and I went to help with her initial recovery. One day for lunch my sister and I threw together a slaw with leftover cabbage from a great veggie soup I had made. We included all sorts of veggies and it was a hit. I knew I had a cabbage in the fridge back home and I started thinking about what slaw I'd make when I got home.

I love cabbage. I love raw veggies. What I don't like is classic coleslaw drenched in mayo. And what's with coleslaw that automatically comes with some sandwiches when your choices are limited? In the San Francisco airport I grabbed a roasted vegetable sandwich with feta. Yum. It came with either a side of slaw or potato salad. I knew either choice would disappoint. Too much mayo, too much salt, no recognizable part of a cabbage or a potato. Well, I got the slaw and it was very watery. And it had that deli coleslaw taste that I just don't like. Does that flavor come in a bottle that delis everywhere purchase?

There's no reason to stick to the old slaw formulas when there are endless options for dressing. This time I gave the slaw some Asian flavors - sesame, ginger, and garlic. A jalapeno pepper for heat. Golden raisins for sweetness. Slivered almonds for extra crunch.

I used the following ingredients:

about 5 cups of sliced cabbage
two carrots, grated
a cup of sliced almonds
a half of a cup of golden raisins
about a half of a cup of celery, sliced thinly
a jalapeno pepper, mostly seeded and sliced
a half of a cup of chopped fresh cilantro
two teaspoons of toasted sesame oil
about a tablespoon of apple cider vinegar
olive oil
4 garlic cloves, smashed or chopped
1 sq. inch of fresh ginger, chopped
salt and pepper to taste
I'm not sure how much olive oil I used. Maybe a quarter of a cup. Ultimately, I did not use all of the oil/garlic/ginger mix. I added it to taste, like I did with the cider vinegar. To mellow the garlic and the ginger, I simmered them very slowly in the olive oil. I do this often to garlic in order to bring out the sweetness and cook it enough to take the sting out of it. It's a method I use for pasta dishes or if I want to add garlic and oil to bread or a spread/dip. In a fair amount of olive oil, simmer the chopped garlic and ginger every so gently on the lowest heat setting. In the meantime, chopped your ingredients. And don't worry about measuring the oil, use as much as you need for the slaw and then save the remainder. Hey, garlic/ginger oil is never a bad thing to have on hand, right? How good will that be on tonight's salad with dinner?
So take all of these ingredients and toss them well so everything is coated to your liking. Taste and re-season, if needed. That's how I added the vinegar. I almost didn't add it. It was delicious without it but I knew that a splash of something acidic (lime, lemon, vinegar) would brighten the finished slaw. I could eat the whole bowl. But I didn't. Not a good idea to eat enough slaw for six people, even if you live alone - which I don't.

Nov 26, 2010

Pumpkin Coconut Curry

The weather outside is frightful but pumpkin coconut curry is so delightful. If you've no reason to roll, grab a bowl, grab a bowl, grab a bowl.

Wow, OK, got the bad puns out of my system for now. To fight the chill we are experiencing in our own private ice-land in West Seattle, I made a warm, spicy, and fragrant pumpkin curry.
Our favorite Thai place, Buddha Ruksa, has a delicious prawn and pumpkin curry. I've been meaning to replicate it at home. While surfing the web I stumbled onto Martha Stewart's Curried Coconut-Pumpkin Stew. Taking inspiration from each dish, I created my own pumpkin curry, creamy with coconut milk, spicy with ginger and jalapeno, and fragrant with freshly ground and whole spices.Here is what you need:

* 2 tablespoons olive oil
* 1 teaspoon black mustard seeds
* 1 teaspoon whole cumin seeds
* 1 cardamon pod, smashed
* 1 teaspoon turmeric
* 1 onion, finely diced
* 4 cloves garlic, minced
* 1 jalapeno pepper, ribs and seeds removed, finely chopped
* 2 teaspoons minced fresh ginger
* 1 rounded teaspoon curry powder
* 1 rounded teaspoon coriander powder
* 2 1/2- 3 cups peeled, cubed pumpkin
* 1 14 oz. can coconut milk (you can use light coconut milk)
* 1 cup milk, any kind, or even water
* 1 pound extra-firm tofu, cut into 1-inch cubes
* 1 tablespoon freshly squeezed lime juice
* Salt and pepper to taste
* 1/4 cup fresh cilantro leaves

(This bowl is sad. It's empty.)
Here is what you do:

Use a big, heavy pot and heat the oil over medium-high heat. Just when the oil begins to shimmer, add mustard seeds, cumin seeds and cardamon pod. When the seeds start to sputter, add onion, garlic, jalapeno, and ginger and saute until fragrant, stirring a few times, about 2 minutes.

Add coriander and curry powder and pumpkin and stir. Cook for a couple minutes. Stir in the milks and bring to a boil. As soon as it boils, lower the heat to simmer and cover the pot. Continue to cook for about 15 minutes. Check to see if more liquid is needed. If so, you can use more of either milk or even water.

Then add the tofu and simmer about 10 minutes, uncovered, until pumpkin is tender.

Add the lime juice, taste and season for salt . You can add cilantro to the whole pot or just garnish individual bowls. Kick up the spice with your favorite hot sauce. Temper the existing spice with a side of cool plain yogurt.

You could serve this with any rice or grain or just enjoy a bowlful of curry. It was warm, spicy, and filling.

Aug 22, 2010

Escarole and Beans

Beans and greens. Another Italian favorite. The greens can be something other than escarole and the beans can be any kind you like But escarole and cannellini are a classic combination. Also, our New Roots Organics delivery supplied us with a giant head of escarole. The second I saw it I knew what we'd be eating this weekend.

This is a dish for any season and any time of day. Yes, I will eat beans and greens for breakfast. Why not?
This is a simple dish and it comes together quickly. And I love when I can cook a meal in one pan. Here are the simple ingredients.

2 tbsp. extra virgin olive oil
3- 4 garlic cloves, chopped or smashed
red pepper flakes, to taste
1 head escarole, washed and chopped
2 15 oz. cans cannellini beans, drained and rinsed (or the equivalent amount of dried beans you've cooked)
coarse salt and freshly ground black pepper, to taste
pat or two of butter or favorite butter substitute
parmesan, to taste

I use a large skillet, about 3 inches deep with a lid. Heat over medium-high heat and add oil. Add the garlic and red pepper flakes and cook for about a minute. You don't want the garlic to burn. Toss in the escarole. Using tongs, toss all the greens to coat them in the olive oil. Cook until the escarole starts to wilt.

Add the beans and combine. Add about a half cup of water, lower the heat and cover. Simmer this for no more than 10 minutes. Then uncover and let some of the fluid simmer away. Add the butter, if using. Season with salt and pepper. Escarole can be bitter. Some times, it can be really bitter. Add a pinch or two of sugar to the dish if bitter is not your thing.

Serve it up and garnish with the parmesan.

Homemade croutons would be really good on top. And a hunk of crusty bread couldn't hurt. And there's nothing stopping you from making this a soup. In the beginning, while cooking the garlic, add chopped onion too, even a diced carrot and some chopped tomato.

Or make it a seafood soup and throw in some mussels to steam.

How about some diced sausage? It's endless. Beans and greens is the base for so many wonderful meals. What are some of your favorite beans and greens dishes?

Jul 8, 2010

Beat The Heat - Gazpacho

Summer took its time to arrive but now it's hot in Seattle. Today we are under a heat advisory. Unusually high heat and humidity. We're not alone. Much of the country is suffering from the heat this week. 91 degrees might not be hot for the East Coast but it is for Seattle where most people and many businesses do not have air conditioning. We do, however, have a nice basement and we'll be down there as soon as we get home from work.

Time to break out the chilled soups. A simple gazpacho is quick to make. Always light and refreshing. There are countless variations on the theme of blended raw vegetables so feel free to experiment. The basic idea remains the same - blend raw veggies and serve chilled.

Here is a simple version you can prepare in minutes. Alter the quantities to your liking.

3 cups vegetable juice or tomato juice
2-3 seeded and chopped fresh tomatoes (peel them too if you prefer)
2-3 tbsp vinegar (I've used balsamic, white wine, red wine)
2-3 tbsp extra virgin olive oil
1-2 celery stalks, chopped
1 cup red bell pepper, chopped (roasted pepper would be really yummy)
1 cup peeled, seeded, chopped cucumber
1/4 cup chopped onion
1 clove garlic, smashed
1 tsp Worcestershire sauce

Blend it all to the consistency you prefer. Or hold some of the chopped veggies back and add them to the blended soup for added texture. Hey, don't blend any of it. Summer is not the season to constrain yourself. Experiment. Wing it. A squeeze of fresh lemon or lime juice would brighten it. A few dashes of hot sauce would kick it up a notch. A garnish of freshly chopped cilantro, chives, parsley would be nice.

It will taste better the next day.

Note: store in a non-reactive, non-metal container.

Dec 5, 2009

Bread Sticks with Sage

After the Sweet Potato Gnocchi, I had a fair amount of leftover fried sage and a tiny bit of the fried chestnuts. What to do? Sage and chestnuts are perfect in stuffing. Stuffing's main ingredient is bread. I like making bread so I made bread but not stuffing. Bread but not for slicing. The result was a combination of bread sticks, rolls and pretzels (pretzels in shape only). The dough is simple. The recipe is from the Sunset Cook Book of Breads. The book belongs to S who bought it new for $2.45 in 1977. It's really a nice book. It's not a giant tome on the art of bread. It's perfect for the kitchen, for carrying around the house in case you want to read it while on the couch, lying in bed, sitting on the deck, wherever you might be planning a bread in your head.

The only changes I made to the recipe are the addition of sage and chestnuts and I might have used bread flour for half the flour. I honestly can't remember. That's sad considering I made these just a week ago. Here are the ingredients.

4 to 4 1/2 cups all-purpose flour (don't see why you couldn't combine flours)
1 tbsp sugar
1 tsp salt
2 packets active dry yeast
1/4 olive oil
1 1/4 warm water
3 tablespoons chopped fried sage leaves
1 egg white beaten with 1 tablespoon water (optional)
Coarse salt

The book assumes you're using a standing mixer. I don't own one and don't need one. Besides, I like to make bread with my hands.

In a bowl, combine 1 cup of flour, the sugar, the salt and the yeast. Add the oil and combine. Gradually add the warm water until it's gone. Then add enough of the remaining flour, a half cup at a time, until the dough has come together enough to work with your hands.


Turn out the dough onto a well-floured surface or continue to work in your large mixing bowl. Using well-floured hands, bring the dough together and work into a nice smooth ball. It was at this point that I kneaded into the dough my chopped fried sage and chestnuts.


This recipe doesn't call for kneading or a long rise time.
Once the extra ingredients were incorporated into the dough, I divided the dough into about 15 or 16 equal pieces. Using the same basic coil-rope-snake shape, I created bread sticks, pretzel shapes and coiled bun shapes.
I set these aside oiled baking sheet to rest for 15-20 minutes. In the meantime, pre-heat the oven to 375 degrees.
If you like, before you bake, give these an egg white wash and sprinkle with coarse salt and/or your favorite combination of seeds. Then just bake until they are as brown as you like. Misu has to investigate everything. And when I have my face to the camera and the camera pointed at the product, I can't see or hear her approach. Suddenly, her nose is in the frame as I'm clicking. Savory bits of fried sage and crunchy morsels of salt. These are great just as a snack or with soup or stew or a salad.

Sep 10, 2008

Roasted Red Pepper Paella

This dish, rather this method for making rice, is based on Mark Bittman's Tomato Paella. I have made the original recipe with the tomato wedges and it's great. But now I just use this method whenever I want a one pan rice dish, especially when I want to incorporate other cooked ingredients rather than having just plain rice on the side. It's just a great method that lends itself to whatever ingredients you have on hand. And the next day the flavors are even deeper.

For this version I used red peppers that I had roasted on the grill earlier in the week and homemade chicken stock. In the past I've used vegetable stock, homemade chicken stock, homemade shrimp stock (the shrimp went into the dish), and plain water. I've added a splash of white wine. And I've added so many different seasonings and vegetable combinations I can't recall them all.

Here is what you need:

2 tbsp extra virgin olive oil
1 large onion, diced
3-5 cloves garlic, chopped (hey, we love garlic)
1 heavy tbsp tomato paste
2 heavy tbsp canned, diced, green chili
1 heavy tsp freshly ground cumin
1/2 tsp freshly ground allspice
salt & pepper to taste
2 cups short grain rice, like Spanish bomba or Italian arborio
3 1/2 -4 cups broth/stock/water, heated to almost simmering

Make sure you have an oven-proof pan with straight sides large enough to hold all of these ingredients. Begin by preheating your oven to 450 degrees. Heat the oil on medium-high. Have your hot stock close at hand. Once the oil is hot, add the onion and cook about 5 minutes. Add garlic and cook another minute. Stir in tomato paste, green chili, salt, pepper, cumin, and allspice and combine.

Add rice and stir to coat all the grains. Cook for just another minute or so. Next add the hot stock and stir to combine. At this point you can taste for seasoning and adjust if necessary. This is when you add your starring veggies or shrimp or chicken or anything else.* Bring it all back up to a boil.

Once the liquid is boiling, put the pan in the oven and cook for a total of 15 minutes. At 15 minutes I check for doneness by tasting a couple grains. If more time or liquid is needed, I make the adjustments and continue cooking a few minutes at a time until the rice is tender. Take the pan out of the oven and let it sit for a few minutes. Do not, I repeat, do not grab that pan handle without an oven mit. I did it once. Once. That was a long night and the blisters lasted a few weeks.

A nice suggestion in Bittman's original recipe is to "put the pan over high heat for a few minutes to develop a bit of a bottom crust before serving." I've not tried this yet because we always eat before I can think to do it. But it sounds good.Once you dig in the design is ruined so I photographed the dish in its pre-chow form, still in the pan.

*I have found that arranging veggies and things in decorative patterns is for naught if you do it right after you've added the liquid. Everything ends up floating all over the place and whatever design you've created is lost. If presentation is important, I cook the dish for at least five minutes and then add my decorative ingredients. That's what I did with the peppers in the photo. I rarely do this but I wanted you to see that it's a nice touch.

Aug 26, 2008

Urad Dal Roti

I'm amazed at the various roti/paratha recipes I see on the web. So many creative ways to incorporate a wide variety of ingredients. Now that I have the hang of making roti/parathas, I'm experimenting now and then with new versions. As I suspected, I had leftover urad dal. Not to worry. It's easy to incorporate leftover dal of any kind into warm and savory roti or stuffed parathas. You get your protein and your arbs in one bite!

I put my cup of leftover urad dal in the food processor with about two tablespoons of water, ground cumin, chopped cilantro, salt and a couple teaspoons each of two homemade spice blends - sambar powder and garam masala. I blended this until it all stuck to the sides of the bowl. I didn't need it to be a puree but I didn't want the individual pieces of dal in my roti.

In a mixing bowl I added atta a little at a time to the dal until I had a soft "dough" that wasn't too sticky. I used 3/4 cup of atta before I reached a consistency that felt right. I coated the dough with a few drops of oil and let it rest for about 15 minutes.

I then sectioned the dough into 6 portions that I rolled into balls. Keep extra atta on hand for dusting. Onto a flat surface I rolled out the dough (dusting as needed) into relatively thin rounds about six inches across. I heated my non-stick skillet to medium-high heat. Once the pan was hot, I placed a rolled-out roti in the center and let it sit. In about a minute, look for it to change color around the underside edges and you will see little puffs forming in various places. Flip the roti and continue cooking. Sprinkle a tiny amount of oil over the surface and spread with the back of a spoon.

Flip again and you will see that the roti has darkened in color and hot spots have formed. I add another tiny dribble of oil at this point. From here I continue to cook and flip until the roti get to the color you see in the photo. Cool these on a wire rack for a couple of minutes then eat right away.
What will be the next addition to my roti/paratha?

Aug 22, 2008

Cool Cucumber Salad

Cucumbers. Cool and crisp. A wonderful addition to many different kinds of salads. But this recipe features cucumbers tossed with a sweet and zingy dressing. Salad:
  • 1 English cucumber, thinly sliced
  • 1/4 cup diced red bell pepper
  • 1/4 cup shredded carrot
  • tbsp minced shallot
  • tbsp minced cilantro
Combine all ingredients and toss to evenly distribute. Dressing:
  • 2 tsp toasted sesame oil
  • 2 tsp honey
  • 2-3 tsp mirin
  • 1 tsp rice vinegar
  • 1 tsp vegetable oil
  • juice of one small lime
  • salt to taste
Combine all ingredients. Toss with salad. Serve chilled. Try these optional ingredient ideas:
  • red chili flakes
  • crushed peanuts
  • flaked, unsweetened coconut
  • thinly sliced scallions

Jun 24, 2008

Bok Choi with Black Bean Sauce and Chili Paste for Grow Your Own #11

This is my entry into June's Grow Your Own monthly blog event started by Andrea at Andrea's Recipes.I harvested quite a bit of baby bok choi today. I washed it right in the yard and the washing water went right back into the garden. I then gave it a spin in the salad spinner, let it dry a bit, then enjoyed it.

Into a large skillet I heated 2 tbsp olive oil on medium-high heat. I added two garlic cloves, minced, one teaspoon of chopped ginger and let this cook for just a moment. I then added all of the bok choi and gave it a good toss with a pair of tongs. Let this cook a few minutes then dribble in about a 1/4 cup of water. Add a heaping half teaspoon of black bean sauce and a teaspoon of your favorite chili paste. Toss the pastes to incorporate them into the mix. Cover and cook about five more minutes. I like a bit of crunch to the bok choi stalks. Serve it right away.

You can remove all of the bok choi from the pan then reduce the sauce to thicken it. I was too hungry and impatient tonight. I barely allowed myself to snap a photo.

May 29, 2008

Tofu Salad with Asian Dressing

This was a quick lunch to prepare and made enough for four. Served cold it was a healthy and refreshing part of a filling lunch. You could also serve it warm by tossing it in a saute pan for a few minutes. Serve it over a bed of fresh salad greens or stuffed into a pita or rolled into a tortilla, perhaps with crackers or even crusty bread. Just combine all the ingredients and you're ready.
  • 1 lb. extra firm tofu, pressed a bit, then diced
  • 2 tbsp mirin
  • 1-2 tbsp Spicy Cilantro Garlic Paste
  • 1 tsp fish sauce (optional)
  • 3-4 shakes toasted sesame oil
  • 1 tsp back bean paste
  • 1 tsp rice vinegar
  • juice of 1 lime
  • 2 scallions (green onions) thinly sliced
  • 1/2 red bell pepper diced
  • 1 carrot, grated
  • sesame seeds as garnish

May 22, 2008

Impress Your Friends with Mushroom Pate


How fancy does this sound? But it is so easy to create. If you can saute mushrooms for any other dish, you can make this pate. And it's so smooth and mushroomy (a new word). Spreads, dips, veggie pate are all favorites of mine. They are versatile, quick, easy.

I read several pate recipes online before I decided on these final ingredients and my own method of preparation. As usual, I wanted to use what I already had in the house.

3 tablespoons extra virgin olive oil
1/2 cup finely chopped sweet onion
2 cloves minced garlic
1 pound white button mushrooms, coarsely chopped ( I will not get into the debate about rinsing mushrooms in water vs. wiping with a damp towel. My preference has always produced the desired results. If your method does too, use it. If it doesn't, try something else.)
1/2 ounce dried porcini mushrooms
1/2 cup dry white wine
1 tsp fresh thyme
salt and freshly ground black pepper to taste

First, reconstitute your dried mushrooms in one cup of boiling water. Let them soak while you prepare the rest of the dish. In the olive oil, over medium-high heat, saute the onion and garlic for a couple of minutes to soften. Then add all of the fresh mushrooms, toss to coat, and continue to cook until the mushrooms really soften, start to wilt. Add the reconstituted porcini mushroom (reserve the liquid) and incorporate into the pan. I continued to cook until I could see the mushrooms had taken on a darker color. Then add salt, pepper, and thyme and the wine plus half of the porcini liquid. Continue to cook until the liquid has evaporated. I immediately blended this in the food processor and re-seasoned with salt and pepper. I let it cool almost completely before I packed it into the ramican and chilled it. I didn't want steam (water) forming and making things wet. Chill for at least 3 hours.

I was worried about getting the pate from ramican to plate so I lined the dish with two strips of wax paper.
I thought I would just lift out the pate using the wax paper as a sort of sling. The paper broke from the weight and moisture of the pate but no matter. The pate easily slid right out once I inverted the ramimcan onto the serving plate.

This is a great recipe to bring to a party and impress your friends (or your enemies, even better?). Bring this on a picnic (keep it chilled until it's time to eat). Eat it warm as a dip or spread or chill it and serve as a pate. Frankly, it was hard to resist just grabbing a spoon and eating from the food processor. Well, I did a little. Eat this on toasted pita, baguette, crackers, etc.

Any other veggie pate ideas out there?I'm excited to be submitting this to Chef Erik's Veg Head Carnival. My first time participating.

May 5, 2008

CINCO DE MAYO! Black Bean Fiesta Salad

OK, I have to admit that I won't be having margaritas but I will definitely be having a delicious and healthy celebratory dish to mark Cinco de Mayo. The colors will remind you of a festive pinata. The flavor will take you south of the border (for me that means Oregon but you get the idea). It's quick and easy and healthy and you'll want to eat all of it.

2 cans black beans, rinsed and drained
1 cup corn
1 small red bell pepper diced
1/2 - 1 zucchini diced
1/2 large jalapeno, diced (seeded and deveined for less heat)
1/4 large white onion, diced
juice of one lime
3 cloves roasted garlic
1 tbsp olive oil
1/2 tsp salt
1/2 tsp ground cumin
handful of cilantro, chopped

Just combine all ingredients in a large bowl and you're ready to eat. However, this salad will taste even better if you let it chill for a couple of hours. Tomorrow it will taste better yet.

Apr 6, 2008

Redskin Potato & Greens Salad

This dish is so simple yet so flavorful. It's a great way to use up salad greens that are past their prime.

I like to leave some of the skin on the potato because of the high flavor and nutrient factor. Simply cut into pieces slightly larger than bite-sized and steam until just tender. While the potatoes are steaming, put your greens in a very large bowl. Once the potatoes are done, toss them right on top of the greens. Drizzle with extra virgin olive oil, sprinkle with salt and pepper to taste then toss together gently, else you'll have mashed potatoes and greens. It's a very fresh flavor but with the warmth of comfort food. Really fresh potatoes will give this a sweet and buttery flavor.

You could use any greens you like that will wilt. If using heartier green, first saute a bit to remove some of the potential bitterness and to tenderize. Experiment with different potatoes too. You can dress this like any other salad with a full vinaigrette of your making. Point is, hot potatoes added to a salad are delicious.

Mar 9, 2008

Leftover Somethings

I hate wasting food. I believe there is an obligation to plan well and use the food I buy and grow. So I don't at all mind leftovers. I love them and I love finding ways to refreshen the ingredients to create a whole new dish.

What to do with left over canned garbanzo beans and left over cooked oatmeal? Experiment, of course.

I opened the can of garbanzo beans for a salad. They keep well enough in the fridge for a while. I made oatmeal for breakfast a few days ago. I don't mean instant, I mean real oatmeal that you buy in bulk and cook on the stove. Nope, not quick cook either. It took a whole 5 minutes, this did. Whew! Saved myself alot of time on that choice. Anyway, what would I do with these two items that were taunting me every time I opened the fridge? Well, I knew it would be something savory and I knew it would be a patty or a ball or something along those lines. I took the basic idea from the Lentil Patties and went from there.

While a cup of red lentils were cooking, I blended the leftover oatmeal and garbanzo beans in the food processor.

I diced a large onion and a large carrot and sauteed in olive oil. To this I added the rest of the toasted and ground panch phoron from the dal and a healthy dose of ground cumin, some garlic powder and salt. Into this I added some roughly chopped almonds. Once the veggies were cooked to my liking, I added the blended oatmeal-garbanzo mixture to the pan and mashed it up to combine. Then it all went into the food processor until blended. I could have blended slightly less. Next time. I put the mixture into the fridge for a while to firm up so it would be easier to handle.

I cooked this lentil-bean-oatmeal mix in two different ways. First, I sprayed a muffin tin with cooking spray and filled each space with lentil-bean-oatmeal mix. Then I baked it until the tops were a nice shade of brown. I've had success with this method when cooking falafel, a mixture of similar texture. Much lighter and healthier than deep frying. The lentil-bean-oatmeal mix didn't get terribly firm but after a night in the fridge they did. Still not firm like a burger but they held the muffin shape nicely. I wrapped these and froze them for the future. Upon thawing a batch, I noticed that they retained their shape but as soon as you touched them with a fork they were soft. Still, they tasted great. A great fiber and protein source for a vegetarian wrap. Slather a couple of these "muffins" on a tortilla and dress like you would a burrito. Really tasty.

The other method of cooking was to lightly oil my hands, form patties, lightly dust with breadcrumbs then pan fry in just enough olive oil to moisten the pan. This worked just fine. Again, not as firm as the lentil patties. But so delicious. Hell, you don't have to form shapes or patties at all. You could use it as tortilla filler form the get-go or use like hummus. Get creative. Waste less.

Mar 1, 2008

Miso Sake Tofu

Tofu is really easy to prepare and is perfect for experimenting with different flavors. Unlike alot of folks, I DO think tofu has a flavor. To me, each brand tastes different. I'm not too focussed on covering up the tofu-ness of my tofu. But marinading it is a good way to infuse added flavor to the tofu, especially a blander one. The brand I used for this recipe was on mega-buy-one-get-one-sale so I thought I'd try it. I used one package for this recipe and I froze the other. Freezing, thawing, draining, pressing gives tofu a denseness that I really like. But I prefer Wild Wood Extra Firm Organic Tofu above all others. I also never buy the pre-baked and pre-flavored tofu. Tofu doesn't naturally come with that much fat but those pre-made things seem to pack a good deal. I'll make my own tofu, thank you. Then I can control the fat, the sugar (plenty of it in Asian food, especially processed Asian food) and salt (again, Asian food is full of sodium). Once you have drained and pressed the tofu (if necessary), cut it up however you like - cubes, slabs, sticks, etc. Blend the ingredients and pour over the tofu then gently fold to cover all the pieces. You can marinate the tofu overnight (like I did simply because I was doing other things) or for just an hour. You can bake it, broil it, grill it, fry it. In fact, you need not "cook" it at all. It isn't raw. Tofu is perfectly edible right out of the package. Marinate it, drain off the marinade and make a salad with it. Stick toothpicks in it and serve it as an appetizer. And the great thing about a non-meat marinade is that it can be used as additional sauce for dipping. So go try some tofu, already. 14 oz. extra firm tofu, drained, pressed, cut into slabs 1 tsp black bean, garlic sauce 1 tsp fish sauce 1 tsp toasted sesame oil juice of half a lime 1 tsp mirin 1 tbsp sake 1 tbsp Chinese black vinegar 1 heavy tbsp aka miso* 1 large garlic clove, minced 1 heavy tbsp minced ginger *A note about miso. I don't claim to know much at all about miso. I do know that there are several varieties of miso, each with a distinct flavor and used for different purposes. I have aka miso in my fridge so this is what I use for all dishes that call for miso. I'm sure it's not appropriate for all dishes in the traditional sense but I really like the taste of everything I've made with it so far.

Feb 6, 2008

Guacamole Without The Superbowlay

The second best thing about the Superbowl is that avacados are on sale everywhere. I love them. I love that they are good for me. I love how they taste and how they feel. I love them in all sorts of recipes but today let's just make the classic avacado stand-by...guacamole.

The simplest way to make guac is to coarsely chop your avacado and mash it with a few tablespoons of your favorite salsa. Now, before you purists take umbrage, just listen. We all have a salsa we like best and the basic ingredients for salsa are also the basic ingredients for guac. This simple recipe is really tasty.

If you want to make it from scratch, so to speak, here's what you do:
  • coarsely chop the avacadoes into a good-sized bowl
  • add one tomato, cored, seeded, and diced
  • add half a medium-sized white onion, diced
  • add one jalapeno, seeded and de-veined (or one or the other or neither depending on your tolerance for heat)
  • add the juice of half of a lime
  • add coarse salt to taste
  • fold all ingredients together
Oh, the first best thing about the Superbowl? I didn't have to watch it.

Jul 19, 2006

Sauteed Greens

We have greens coming from every direction in the garden. We can't eat them fast enough. Lettuces everywhere and various other forms of leafy things that we saute. It's a very quick and easy process once the greens are thouroughly cleaned.

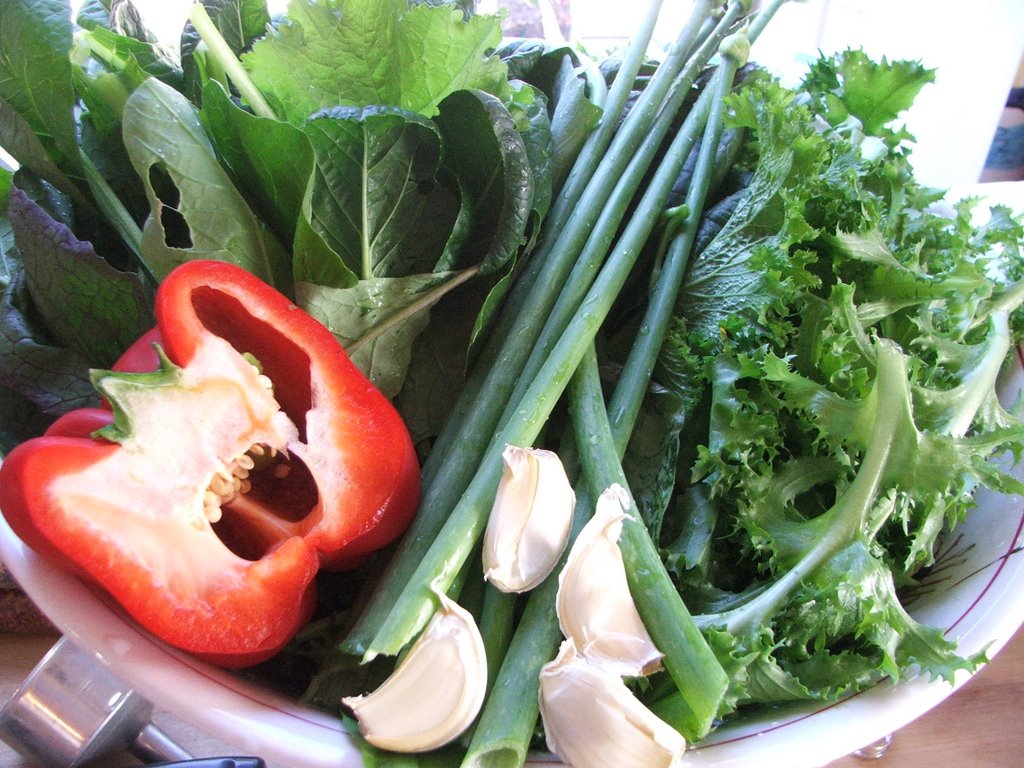
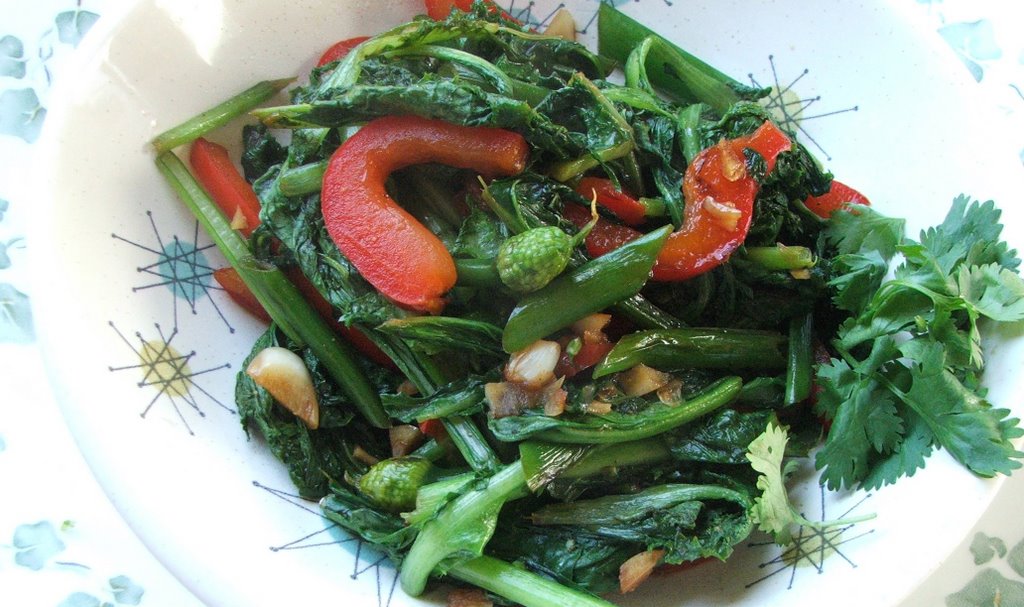
Here I've got some endive and a variety of saute greens, a red bell pepper, some onion scapes, and some garlic. Everything but the red pepper was grown here at home.

In a couple tablespoons of olice oil I saute the garlic, the scapes, and the pepper which I've cut into strips and then halved. After a couple minutes I stuff the pan with greens that I've usually ripped in half for a more manageable bite. I start turning bunches of greens with my tongs as I try to coat it all with the sauteed veggies and olive oil. About a minute later I splash in some soy sauce and some vinegar (either Chinese black vinegar or balsamic), grind some coarse salt over the whole thing, sometimes some garlic powder too, then I sprinkle a tablespoon of brown sugar over it all. This isn't always needed. But the endive is pretty bitter. And there you have it. In minutes you have delicious sauteed greens. I can easily eat the whole batch!

LinkWithin

Related Posts with Thumbnails